
As of version 1.4.7+ of the WP Job Manager Search and Filtering plugin, you now have multiple options for customizing the popup shown when using a map field type. Below I will go through each option, how to configure it, including the more customized versions.
HTML data for the card
The first thing to understand, is how the HTML is generated for the card popups. This data comes directly from the listings list itself. Each listing shown in the results, will have a <li> item wrapped around it. When the plugin generates the HTML to use, it will pull it from the data inside this <li> tag. More details are below with the full customization options.
New configuration options
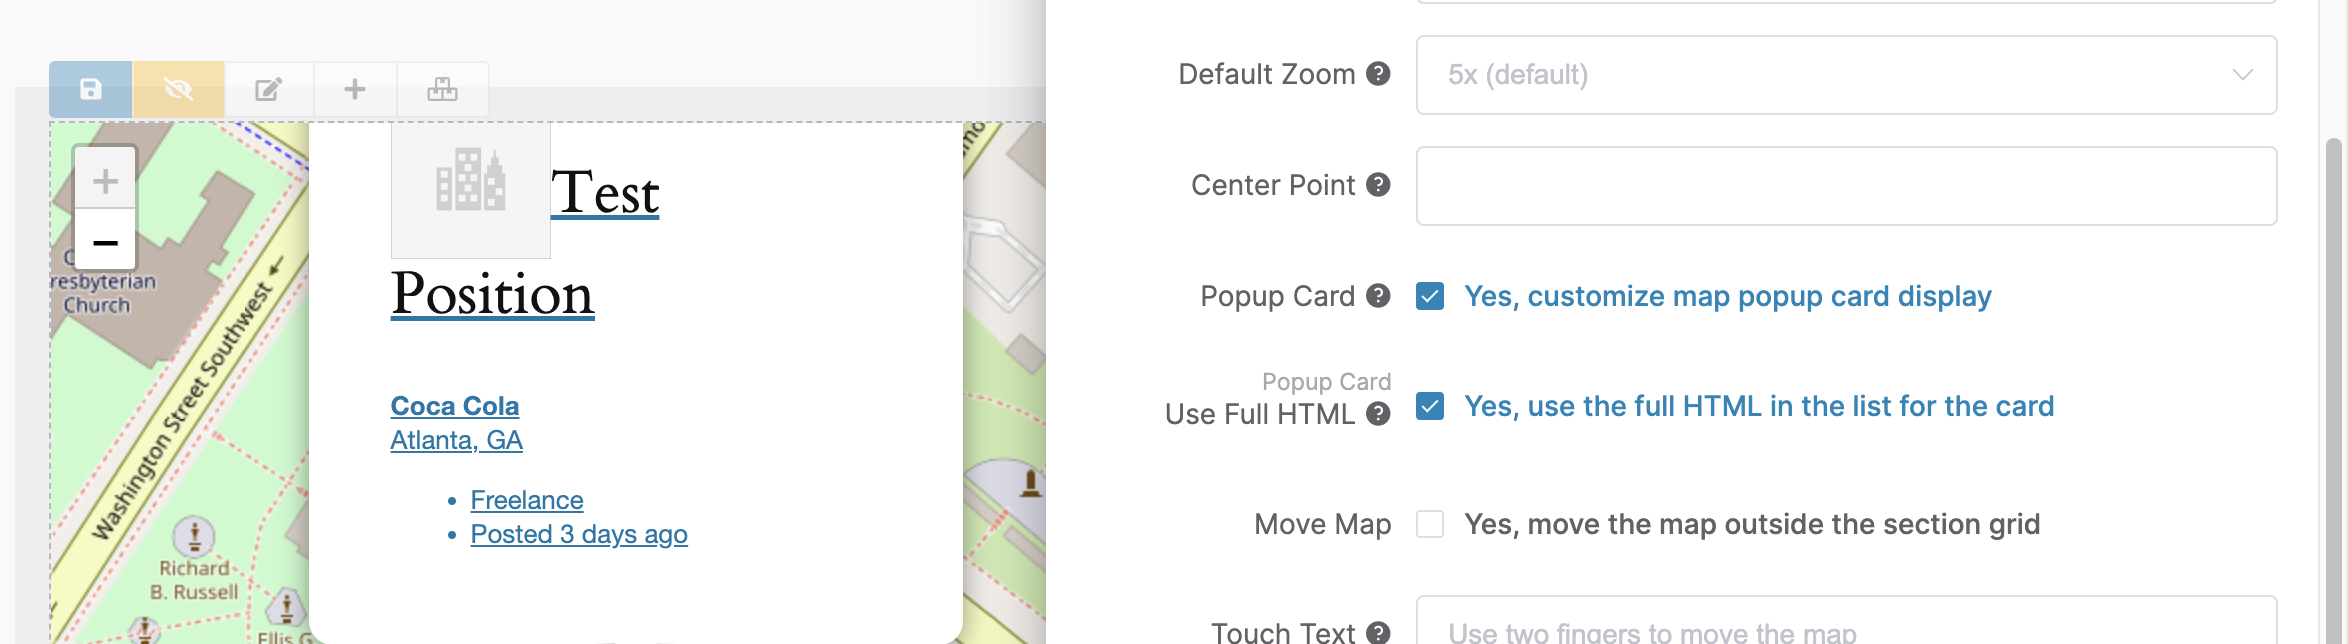
When editing a map field type, if you click on the Type Config tab, you will now see these new options below for customizing the popup card:

WP Job Manager Search and Filtering Map Field Type Custom Popup Settings
By default, prior to version 1.4.7, only the title from the listing ouput (in the list) would be used. Version 1.4.7+ will now show the title, and company name (if one exists). If you want to customize this, click the checkbox to enable the popup card customization.
Use Full HTML
This setting will pull the entire content from the listings table, so what you see in the listings list, is exactly what will be used in the popup. For example, here’s the output in the listings list table:
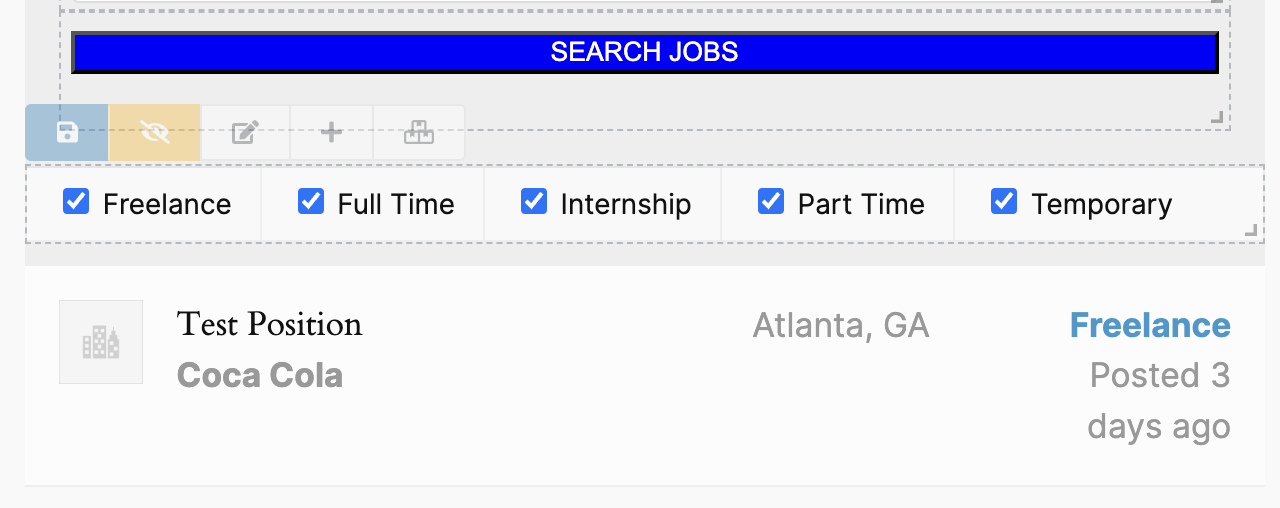
Listings List
When you enable the setting to use the full HTML, you will now see that exact HTML inserted into the popup:
Use Full HTML Enabled
As you can tell though, the format looks a little bit off. The reason for this, is because the styles used for the display in the list table, are only applied when that HTML is inside a specific wrapper element (specifically a <li> inside of <ul>). Because of this, we can’t replicate these wrapper elements without issues, so if you plan to use this feature, you will need to use your own CSS to adjust the styles, and make this look the way you want.
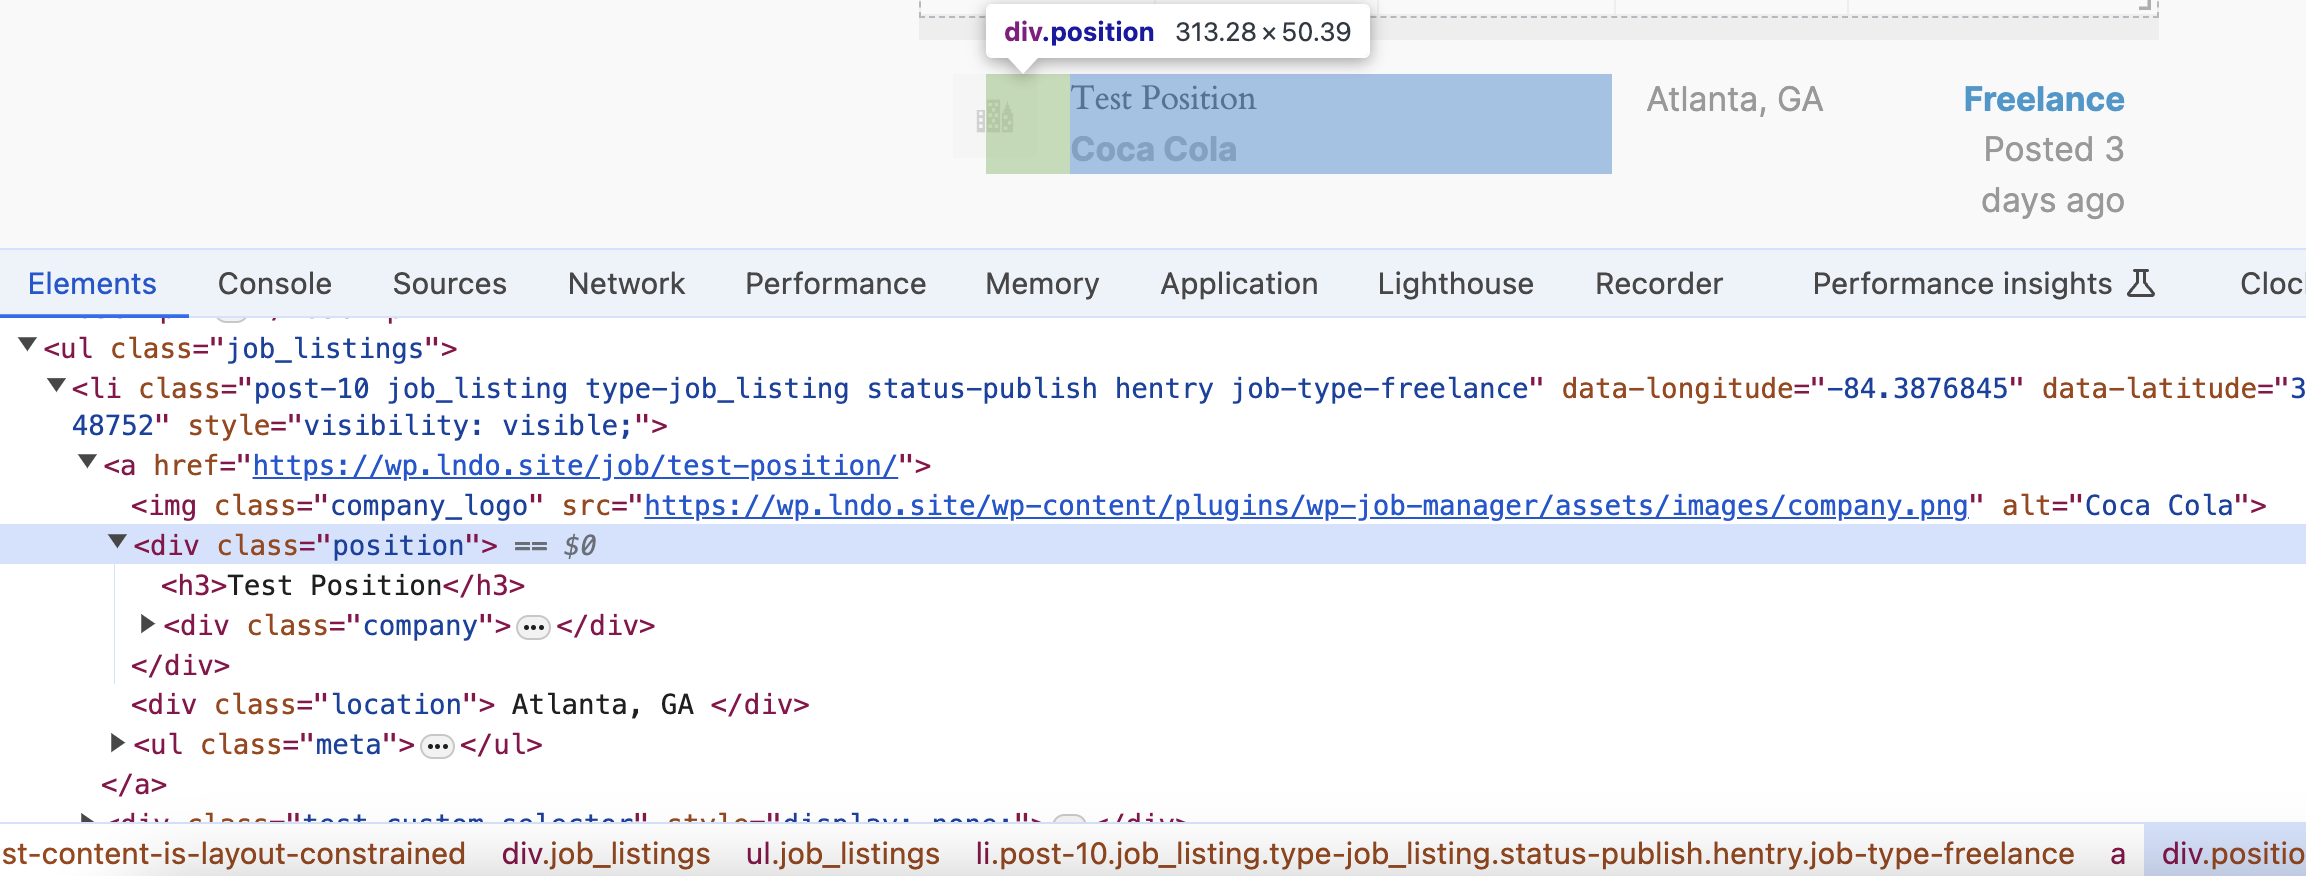
Custom Selector
The other option, is to use a custom selector. This will pull the HTML from any content inside that <li> item, and use that as the HTML for the popup. This is what you will want to use if you want full customization ability. This value should always be a class, and as such, should have a leading . (period).
For example, in the standard layout structure, if you wanted to use the content inside the position class element, you would use a value of .position in the custom selector field:
This is just basic ways of handling this, if you want to take this a step even further, that’s what this feature is really meant for.
Customization in Template
To have full customization functionality, you can edit the template file used to output the listing in the list table, adding your own HTML, and then using the custom selector feature above to select that element. This will require familiarity with PHP.
First you need to understand how template overrides work:
https://wpjobmanager.com/document/developer-reference/themes/template-overrides/
For this example below, we will be using the Job Listings template override, you can find the default file located at wp-content/plugins/wp-job-manager/templates/content-job_listing.php
After you copy this file to your child theme’s directory (using instructions from link above), you can now start editing it and adding your own HTML to output.
Without a Link to Listing
In this example below, we will be creating HTML we do not want to show in the listings table (and only for the popup), without any kind of wrapping link (HTML a tag). When you do not wrap the output in a link element, S&F plugin will automatically do this for you.
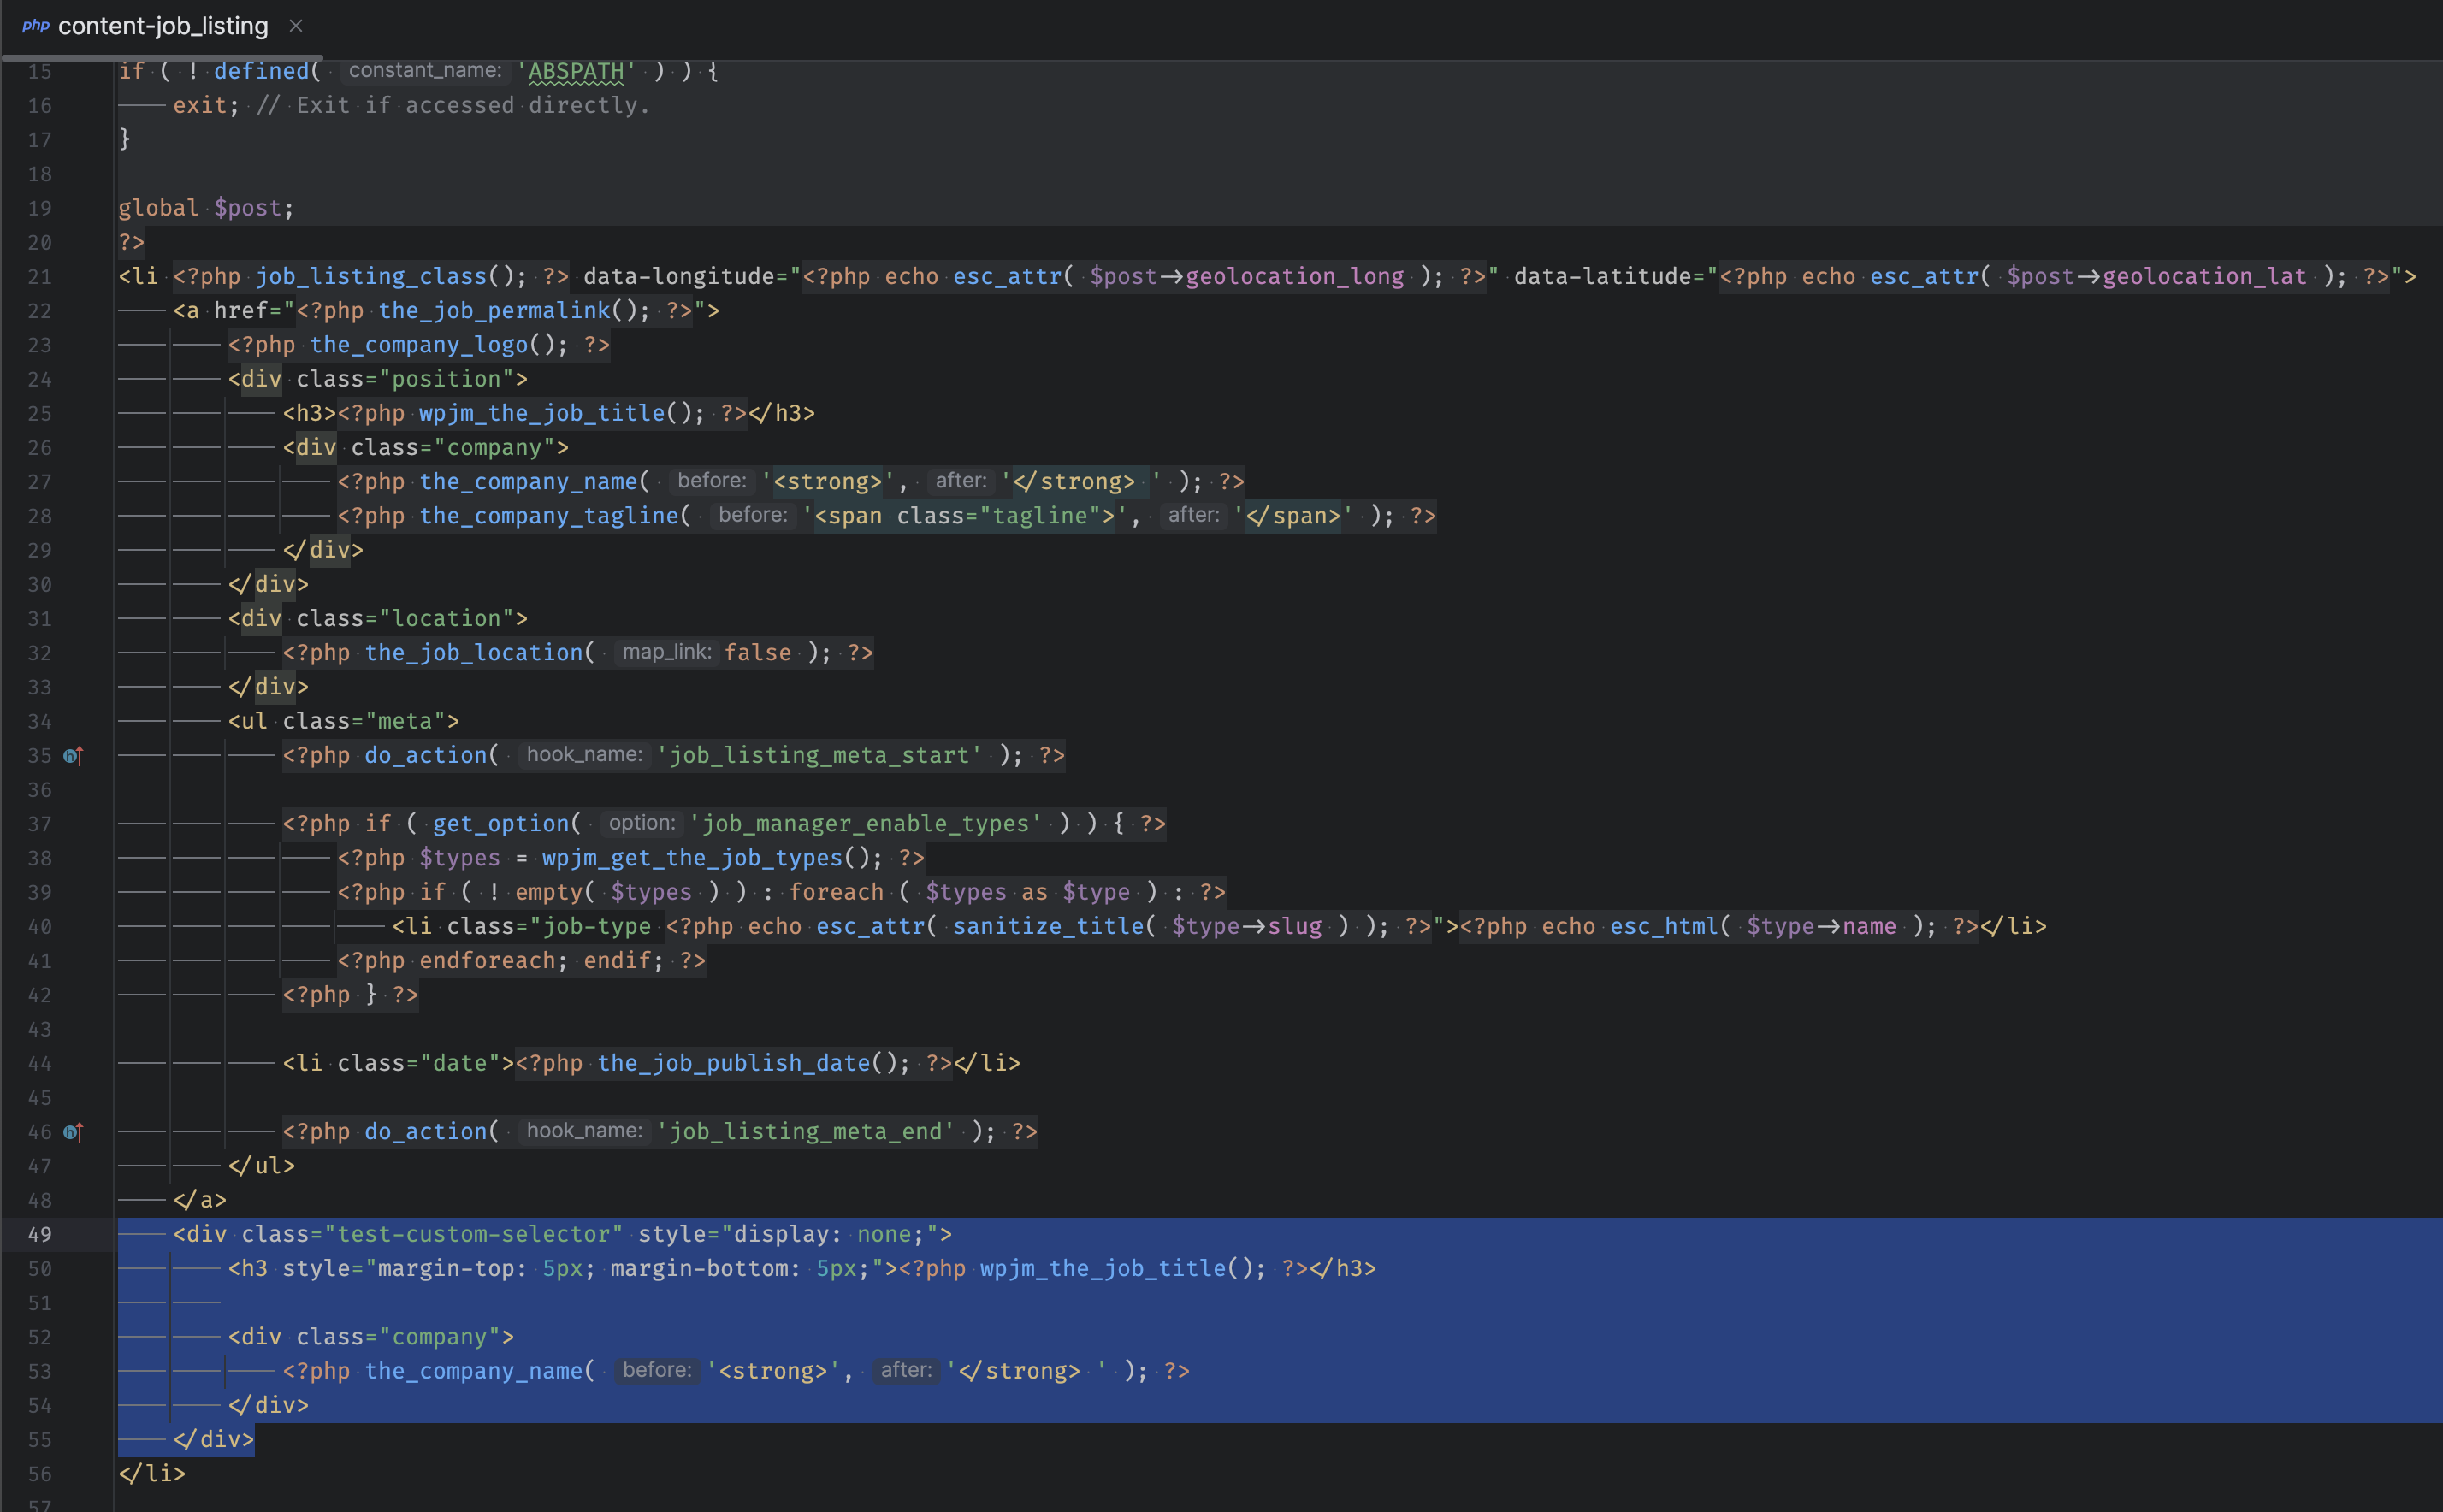
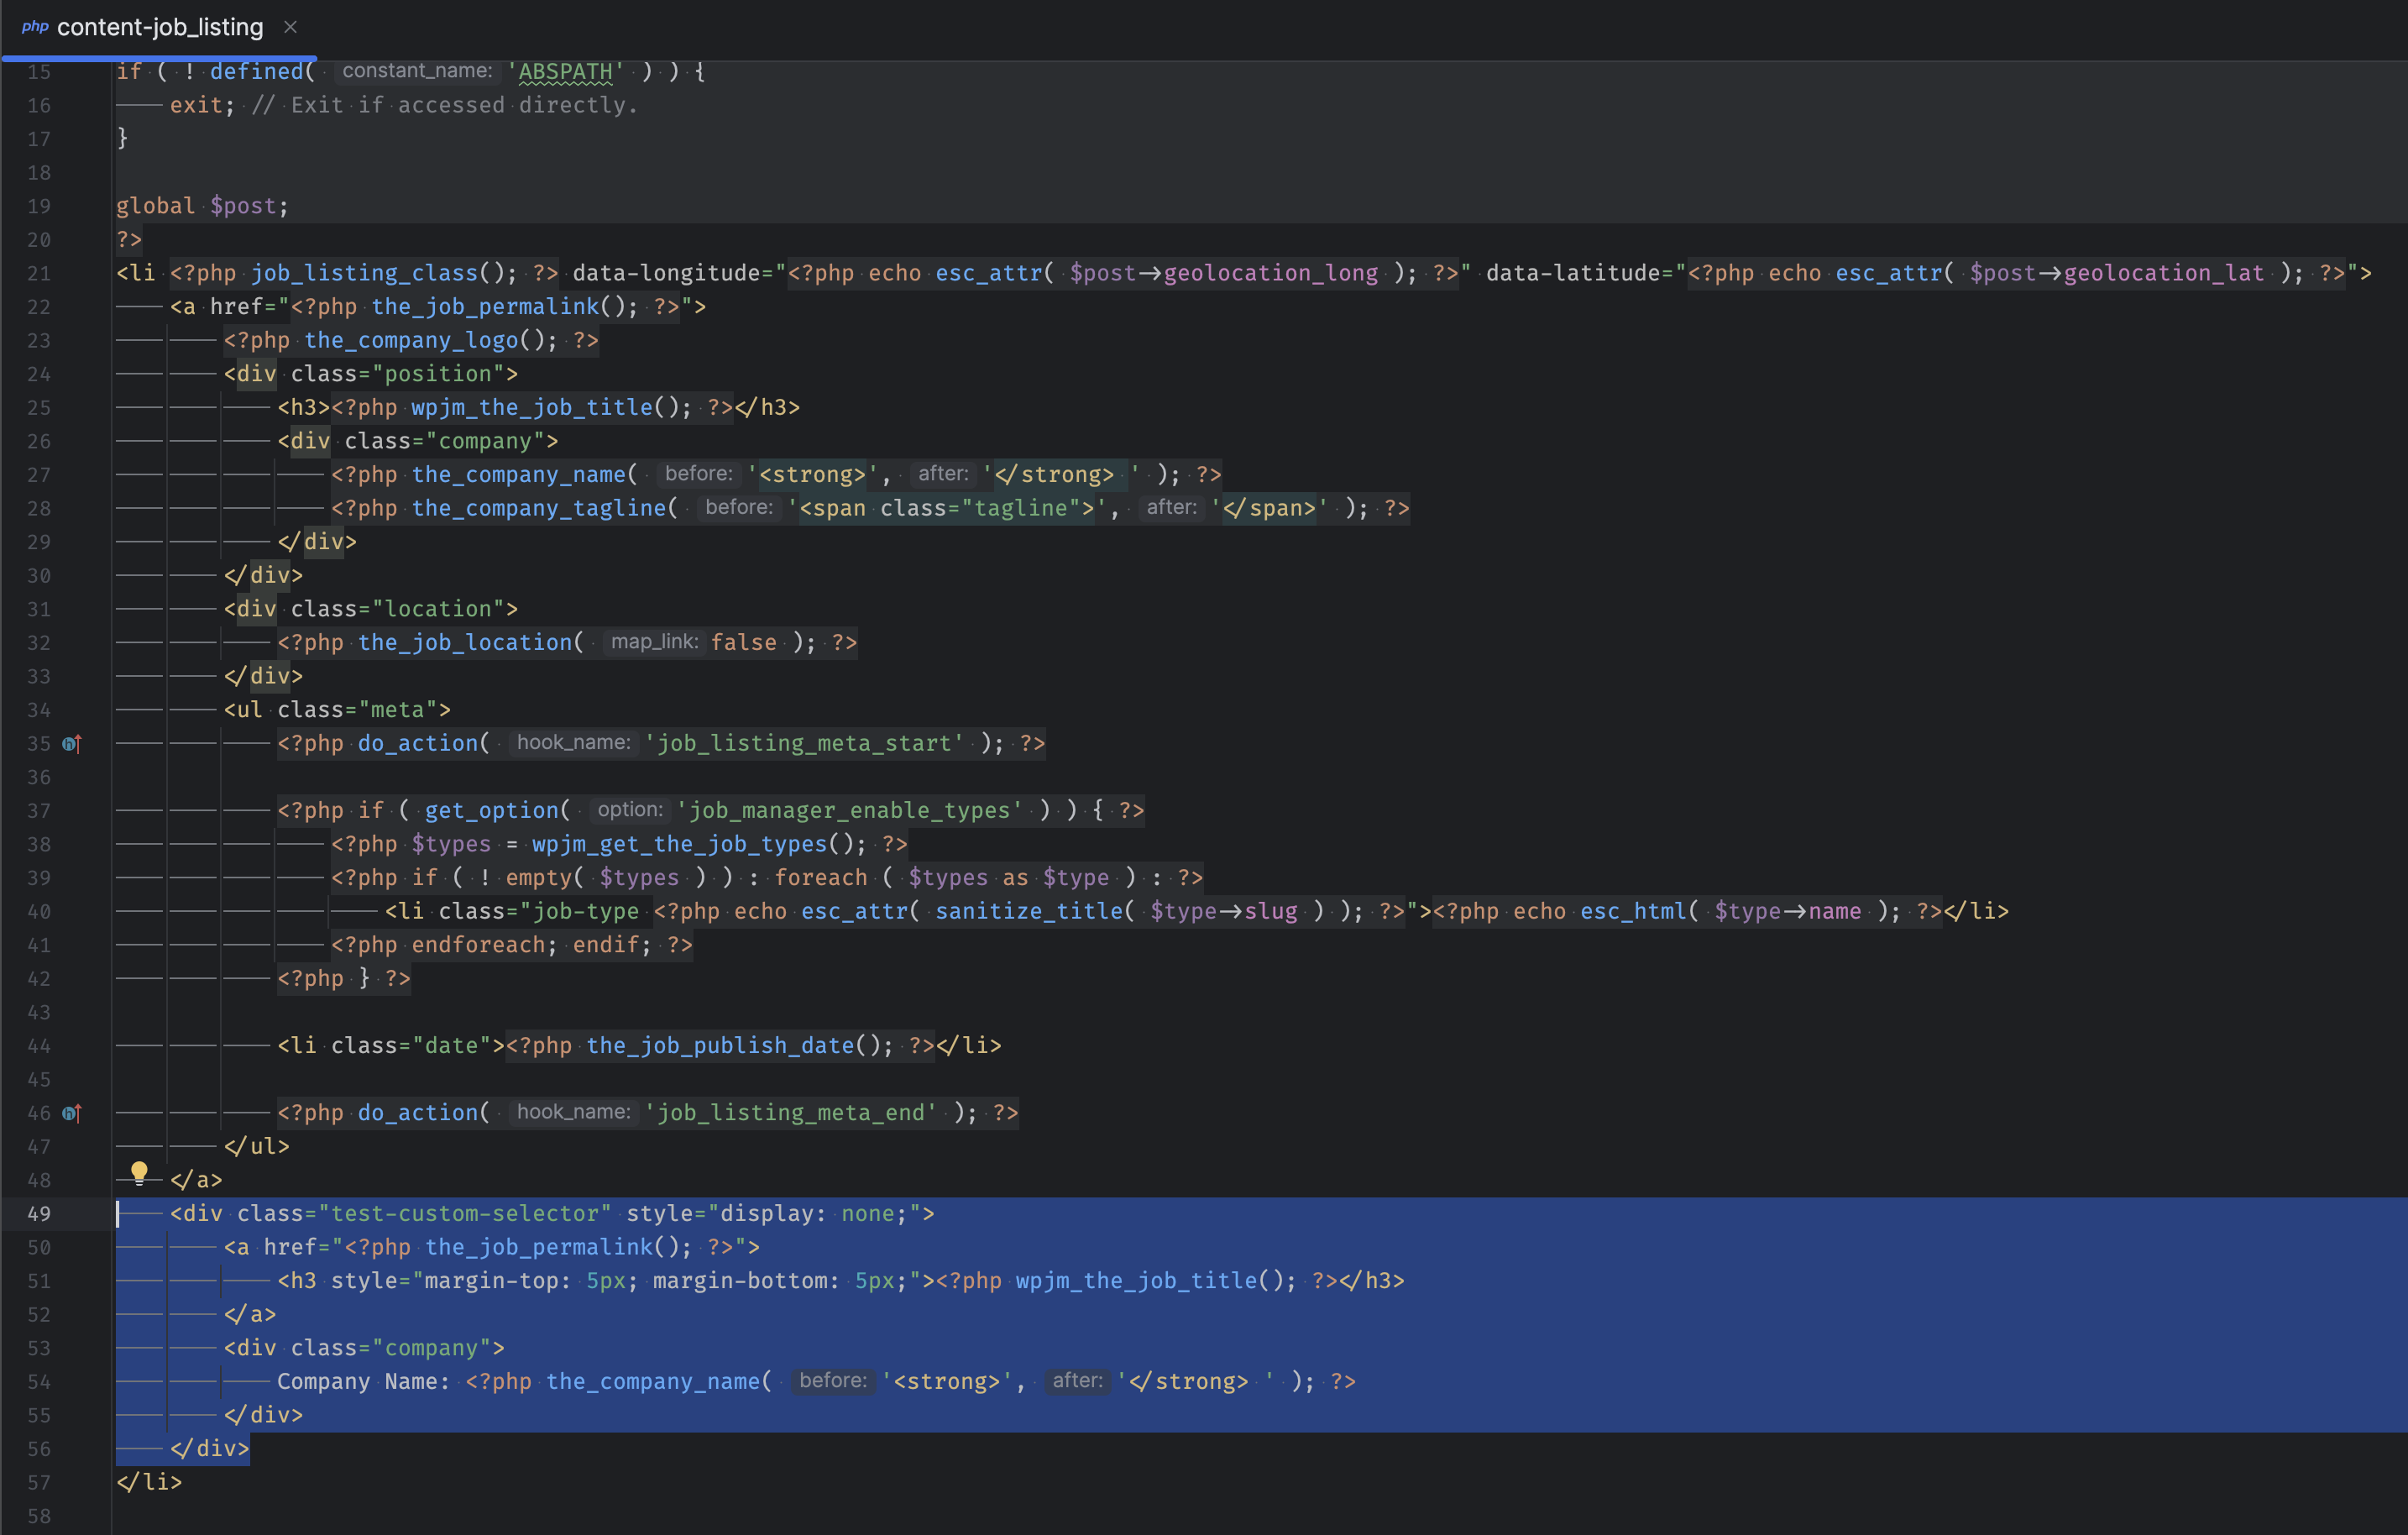
Custom Popup HTML in content-job_listing.php
<div class="test-custom-selector" style="display: none;">
    <h3 style="margin-top: 5px; margin-bottom: 5px;"><?php wpjm_the_job_title(); ?></h3>
    <div class="company">
       Company Name: <?php the_company_name( '<strong>', '</strong> ' ); ?>
    </div>
</div>
As you can see in the screenshot above, i’ve added the following HTML, but the biggest thing to note is the display: none; to prevent it from showing in the listings results table. When the S&F plugin pulls the HTML to use, it will only use the HTML inside the element you define. This allows you to build out a completely custom display for map cards, without it being shown in the results table.
The code above will result in a map popup similar to this:
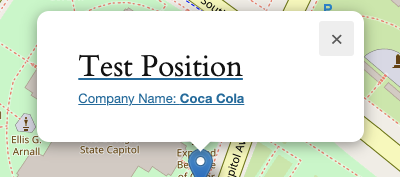
Custom Map Popup Custom Template
With a Link to Listing
Alternatively, you can include a link anywhere inside the HTML to the listing, and the Search and Filtering plugin will not automatically wrap one around the listing. Let’s use the same example as above, but this time let’s put the link around the Job Title only.
Custom Popup HTML in content-job_listing.php (with link)
<div class="test-custom-selector" style="display: none;">
    <a href="<?php the_job_permalink(); ?>">
       <h3 style="margin-top: 5px; margin-bottom: 5px;"><?php wpjm_the_job_title(); ?></h3>
    </a>
    <div class="company">
       Company Name: <?php the_company_name( '<strong>', '</strong> ' ); ?>
    </div>
</div>
The output would look similar to this, where as you can see, the link is only around the title now:
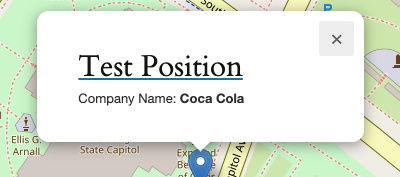
Custom Map Popup Custom Template with Link
These are all just very basic examples to get you started. If you have an elite license and need help with this, feel free to open a support ticket and i’ll be happy to help you figure it out!
Don’t forget to check out the documentation on how to output custom fields using PHP:
 Search and Filtering for WP Job Manager