
Intro
Full Tutorial
WP Job Manager Field Editor now has conditional fields available, current in beta phase while testing is completed and bugs are reported. Below you will find some information about how to use Conditional Fields.
Beta Key Points
- If you configure a group to Show fields, they will be automagically hidden by default (unless logic results in true, then they will be shown)
- Conditional fields are currently NOT supported in admin area (this requires customized code for admin area, which is still being worked on)
- Checkbox values are either 1 or 0 (one or zero), 1 means checked, 0 means unchecked (for entering in logic). If 0 does not work, use IS NOT and 1 (which is the same as IS 0)
- Taxonomy field value are based on the TERM/TAG ID .. not the slug, or the wording. When editing a specific taxonomy term, look at the URL and you will see tag_ID=XXX
In an upcoming release, the value field when setting up logic will automatically change based on the selected field, allowing you to select from available options - Taxonomy field comparison with IS or IS NOT for taxonomy multiselects will check if ONLY that field is (or is not) selected. Use contains to check IF a value is selected (allowing other selections as well)
- This feature is in beta phase, and as such, please make sure to report any issues or problems you have … BUT FIRST read ALL documentation to make sure it’s not covered already. The majority of the time the problem is user error and configuration, not a problem with the plugin. Make sure to check the Developer Console for javascript errors when having problems.
- You should NOT hide any fields required by core WP Job Manager (job_title or candidate_name) as if the listing is submitted without those fields, there will be errors! Basically if you are unable to disable the field, you should NOT be hiding it or setting up logic that could result in that field not being set when the listing is submitted!
- You should always test the logic yourself, don’t just assume it works, makes sure you test 100% before pushing live to your site
Logic
WP Job Manager Field Editor Conditional Logic Disable Fields
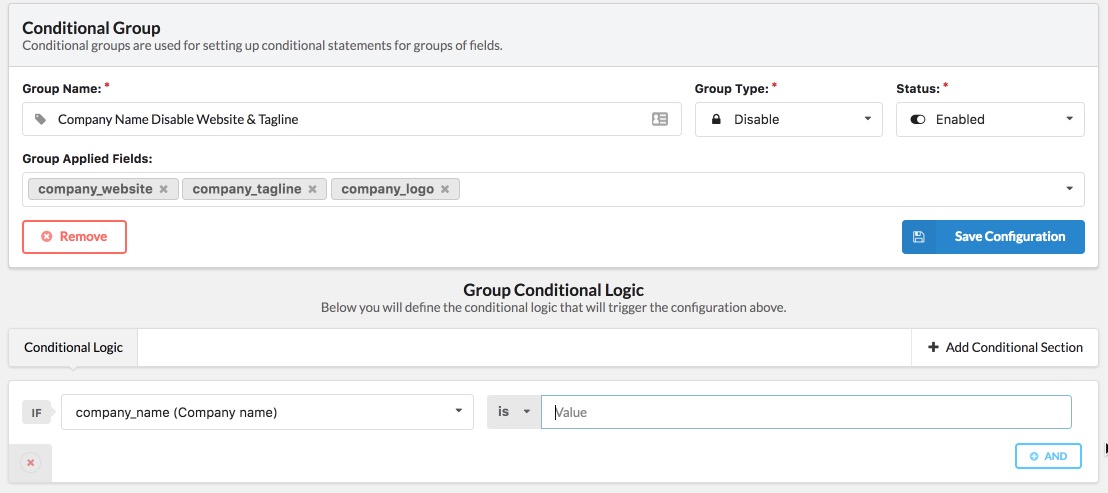
The setup I decided to go with for handling conditional fields logic, was based on a groups with logic applied to those groups. When first setting up a new conditional logic, you will have to create a group. In this group, you will define the fields that you want any of the logic configured in that group, to be applied to. The currently available group types (could also be called “group action”), is show, hide, disable, or enable.
This means that if any of the logic you configure in the group, returns true, then the type configured in the group, will be applied to all fields set in the group configuration.
As you can see in the example above, the group configuration is set to disable the company_website, company_tagline, and company_logo fields. This means that if any of the logic configured for that group returns true, then all those fields will be disabled. In the example above, the only logic configured is when company_name is blank … this means that normally when a new listing is submitted … those fields will already be disabled, and will only be enabled when that logic no longer returns true.
Logic Conditions
WP Job Manager Field Editor Conditional Logic Conditions
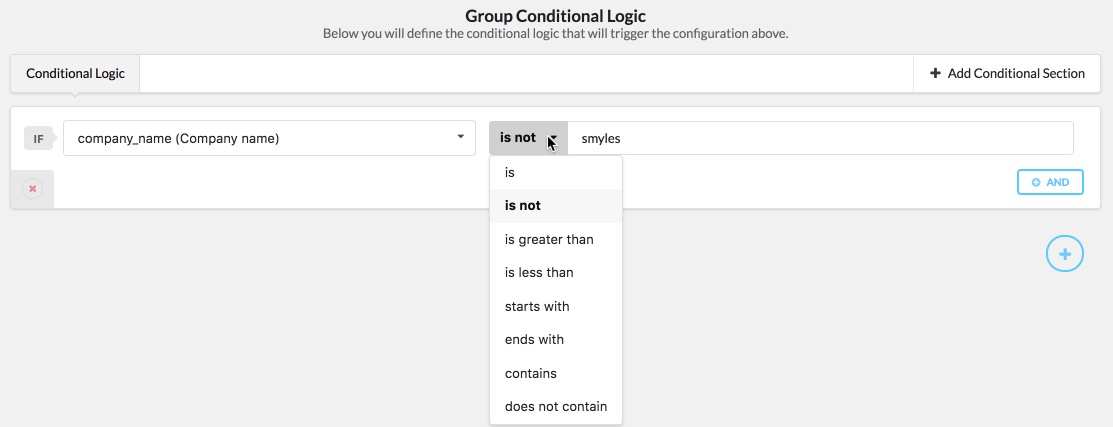
When creating logic for a group, you will be able to select the meta key to compare/check (soon to include other features, like user capability, role, etc), and then a logic condition to use for determining if that logic should be considered TRUE which will then apply the configuration set in the group on the fields, set in the group. As you can see above, there are currently 8 available conditions, which can be used for checking the logic of the selected metakey.
The value to use the comparison against is on the right next to the dropdown for selecting the comparison. Leaving this field blank will result is checking if that field does not have a value (or is empty).
All comparisons are done case-insensitive (meaning case does not matter), which can be changed via filter if you need case sensitivity.
- IS – exact value comparison/check DOES match entered value (if a taxonomy field, IS means “IS ONLY”, use contains for “is selected” for taxonomy multiselect)
- IS NOT – exact value comparison/check does NOT match entered value (if taxonomy field, IS NOT means “IS NOT ONLY”)
- IS GREATER THAN – check if field value is greater ( > ) than entered value. If field is a multiselect, can be used to define selections greater than
- IS LESS THAN – check if field value is less ( < ) than entered value. If field is a multiselect, can be used to define selections less than
- STARTS WITH – check to see if value starts with entered value
- ENDS WITH – check to see if value ends with entered value
- CONTAINS – check to see if value contains entered value. This should be used for multiselect (and taxonomy multiselect) fields to check if a value has been selected.
- DOES NOT CONTAIN – check to see if value does NOT contain entered value. This should be used for multiselect fields to check if a value has NOT been selected.
Field Type Values
- Checkbox – value of 1 means “checked”, value of 0 means “unchecked”
- Taxonomy – you MUST use the taxonomy term/tag ID, to find the taxonomy term ID, go to the taxonomy page, and click Edit on the taxonomy term you want to get the ID for. In the URL bar you will see something similar to this:
/wp-admin/term.php?taxonomy=resume_skill&tag_ID=23&post_type=resume
The taxonomy term ID (called tag_ID in URL) will be located right after tag_ID. In the example above, the term ID is 23
AND Logic
WP Job Manager Field Editor Conditional Fields AND Logic
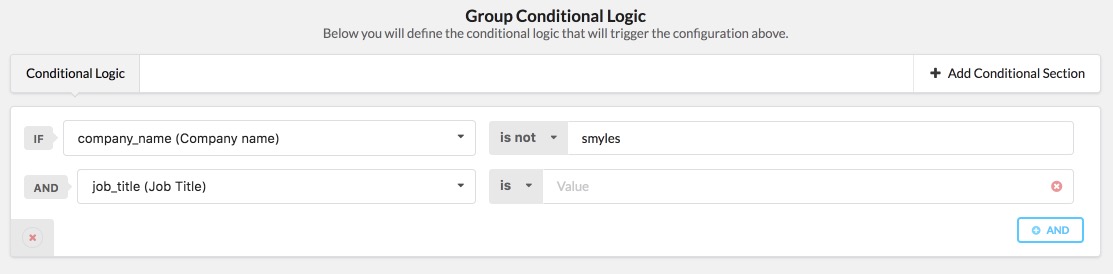
Logic “sections” as they are called, can include an unlimited number of AND logic configurations, simply by clicking the blue button in the bottom right corner of the section box. This will add another line below the initial IF row, where you can select additional AND logic.
In the example above, that logic section will only apply the configuration set in the group configuration, IF the field company_name IS NOT equal to “smyles” AND job_title has an empty value, otherwise, nothing will be applied … unless you add additional OR logic, explained below:
OR Logic

WP Job Manager Field Editor Conditional Logic Disable Fields OR AND Logic
The logic handling has multiple options, allowing you to create very intricate and customized logic configurations, called “sections” for creating OR logic. As you can see in the example above, we now have an additional logic section, separated by OR (added by clicking Add Conditional Section, or clicking the plus icon in bottom right corner).
Along with adding unlimited number of AND logic per section, you can also add an unlimited number of OR logic configurations. This allows you to apply the configuration on the group, whenever ANY of the sections evaluate to true.
In the example above, the company_website and company_tagline field will be disabled, whenever company_name does NOT equal “smyles” … OR … whenever company_name DOES equal “smyles” and job_location field CONTAINS “Orlando”.

 WP Job Manager Field Editor
 Search and Filtering for WP Job Manager